DIY CSS navigation buttons in SAP Design Studio
In SAP BusinessObjects Design Studio you can use the container components like a Tabstrip or a Pagebook to organize your application. The Tabstrip component already includes the tabs for navigation between the pages. For the Pagebook component we have to create our own navigation buttons.
You can use the standard button components, but these have a pretty basic look. In this example I will show you how to create your own custom navigation buttons with some CSS code and a tiny bit of JavaScript.
We will create two buttons. The button for the selected page should have a blue color, the unselected button should be white. Also, when the user hovers the unselected button with the cursor, the button should turn blue.
For this we need three CSS statements. You can add these to your custom CSS file:
- .button_show
- .button_show:hover
- .button_selected
There are several websites available that can help you to create CSS buttons, but you can also use my CSS code and tweak it. Most important here are the colors, which differ between the show and selected versions, and the border radius since I like the looks of the buttons better that way.
.button_show {
 background-color:#ffffff;
 -moz-border-radius:4px;
 -webkit-border-radius:4px;
 border-radius:4px;
 border:1px solid #005092;
 display:inline-block;
 cursor:pointer;
 color:#005092;
 font-family:arial;
 font-size:12px;
 text-align:center;
 font-weight:bold;
 padding:2px 2px;
 text-decoration:none;
 }
.button_show:hover {
 background-color:#005092;
 color:#ffffff;
 }

.button_selected {
 background-color:#005092;
 -moz-border-radius:4px;
 -webkit-border-radius:4px;
 border-radius:4px;
 border:1px solid #005092;
 display:inline-block;
 cursor:pointer;
 color:#ffffff;
 font-family:arial;
 font-size:12px;
 text-align:center;
 font-weight:bold;
 padding:2px 2px;
 text-decoration:none;
 }
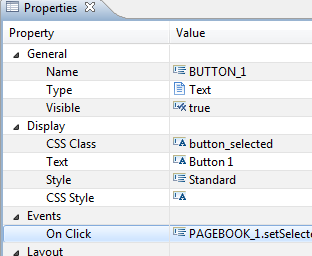
Now add two Text components to the Design Studio app and name them BUTTON_1 and BUTTON_2. Also add a Pagebook component.

Write the following script to BUTTON_1 On Click script editor:
PAGEBOOK_1.setSelectedPageIndex(0);
BUTTON_1.setCSSClass("button_selected");
BUTTON_2.setCSSClass("button_show");
And use the next script for BUTTON_2:
PAGEBOOK_1.setSelectedPageIndex(1);
BUTTON_1.setCSSClass("button_show");
BUTTON_2.setCSSClass("button_selected");
As you can see these scripts switch the pages of the Pagebook component, but also change the CSS class of the buttons. Don’t forget to set the initial CSS class in the properties of the Text components: button_selected for BUTTON_1 and button_show for BUTTON_2.
HackingSAP.com - Mar 30, 2014 | DIY, SAP BusinessObjects Design Studio
Tagged | CSS, Design Studio


4 comments
Parimala
June 9, 2016Good one!
colorswitchhack
June 26, 2016that’s useful thanks !
swapna
November 16, 2016Thank you 🙂 Nice,it is useful
Beyz
August 9, 2018Hi Xavier,
Can you please help us to change button color in Lumira Designer?
Best Regards.
1 Trackback
[…] we have seen in an earlier post we can enhance the looks of our SAP BusinessObjects Design Studio applications with the use of some […]